Payment Gateway Setup (Stripe)
Overview
Maian Stripe uses Stripe as it's payment processing gateway via the Stripe checkout API. Stripe is a popular option for many e-commerce websites and offers fast
secure payments. It is also very slick on small devices making it a good choice if your target audience using phones/tablets. Please read the instructions below carefully to set up Stripe for your store.
Please note that these docs refer to the Stripe interface at the time of development. It may have changed since. We will revise these docs with each new release of this software, thank you.
Please note that these docs refer to the Stripe interface at the time of development. It may have changed since. We will revise these docs with each new release of this software, thank you.
Supported Browsers
Stripe strives to support all recent versions of major browsers. For the sake of security and providing the best experience to the majority of customers, they do not support browsers that are no longer receiving security updates and represent a small minority of traffic.
They support Internet Explorer and Edge per Microsoft's lifecycle policy. As of January 12, 2016, they support Internet Explorer 9 and above.
They support Chrome and Safari on all platforms and Firefox on desktop platforms.
They support the Android native browser on Android 4.4 and later.
They require TLS 1.2 to be supported by the browser.
They respond to bug reports but do not proactively test other mobile browsers.
For the latest browser support information, click here.
Requirements
Stripe account.
1 Enable Stripe API
[1] Sign up for a Stripe account.
[2] Click 'Developers > API Keys' from the menu to generate your publishable and secret keys (if you are using Workbench, access directly from the Developers drop down menu). Generate keys for live and test data. Or create a separate account for testing.

[3] Next select 'Developers > Webhooks'. Click to add new endpoint.

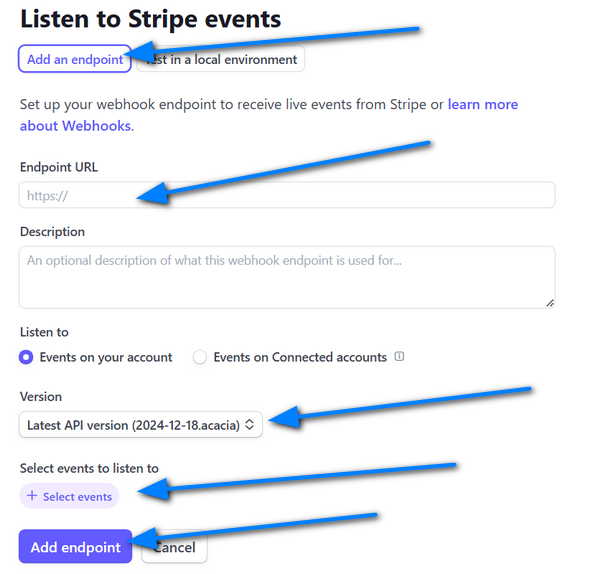
Endpoint URL = https://www.example.com/control/webhook.php (correct path to your own domain/setup).
Description = Anything you want.
Version = Choose the latest version. If the latest version fails, revert to "2024-12-18.acacia".
Select events to listen to = All events/event types
[4] When your webhook has been added, select the webhook and make a note of your 'signing secret'. This is visible when you click to view a webhook. Look for 'Signing Secret' and 'Click to reveal' code.

Setup is Completed! See Below
[2] Click 'Developers > API Keys' from the menu to generate your publishable and secret keys (if you are using Workbench, access directly from the Developers drop down menu). Generate keys for live and test data. Or create a separate account for testing.
[3] Next select 'Developers > Webhooks'. Click to add new endpoint.
Endpoint URL = https://www.example.com/control/webhook.php (correct path to your own domain/setup).
Description = Anything you want.
Version = Choose the latest version. If the latest version fails, revert to "2024-12-18.acacia".
Select events to listen to = All events/event types
[4] When your webhook has been added, select the webhook and make a note of your 'signing secret'. This is visible when you click to view a webhook. Look for 'Signing Secret' and 'Click to reveal' code.
Setup is Completed! See Below
2 Activate in Maian Stripe
[1] Log into your control panel and from the left (off canvas) menu, select 'Settings > Payment / Currency'.
[2] Select 'Live' mode.
[3] Click the 'Parameters' tab. Add the following parameters.
api-key = Your Publishable Stripe Key
secret-key = Your Stripe Secret Key.
endpoint-secret = Your Endpoint/Webhook Secret Signing Key.
[4] The following parameter is optional and can be included if you know what it means:
locale = 2 digit valid Stripe locale
3 Testing Your Stripe Installation
Stripe has a full set of test cards you can use to test the system out. It will also work on localhost (providing Curl is enabled), unlike many other payment gateway setups. For
information on the test cards and test codes, please refer to the Stripe testing page.
Once you are happy everything is working, don't forget to activate your Stripe account and set up your live keys.
Once you are happy everything is working, don't forget to activate your Stripe account and set up your live keys.
4 Enable Gateway Logging
Initially it's a good idea to enable the gateway log to make sure the callback is being received. Select 'Payment / Currency' from the left
menu in your admin area and on the 'Gateway' tab make sure 'Log Responses' is set to yes. All order processing will be logged in the 'logs' folder.
You should disable this when you go live.
You should disable this when you go live.
5 Stripe Checkout Appearance
You can customise the look of your Stripe checkout page in your Stripe control panel.
More info here.
More info here.
6 SCA (Strong Customer Authentication)
Maian Stripe supports v3 of the Stripe API and supports SCA, which came into affect in 2019.
7 Further Information
Now that the payment gateway is set up, refer to the main install page for further instructions.