Add Lockbox
Overview
Here you can add a new lockbox or edit an existing one.
General > Lockbox Reference Name
This is the name or reference of your lockbox. Max 250 chars.
General > Lockbox Template Folder
This is the lockbox content folder associated with this lockbox. You should make a copy of the 'content/_lockbox_default' folder, so
that you can use the default folder for reference. Folders MUST start '_lockbox' to be picked up by the system. All
lockbox folders must be in the 'content' folder.
Redirects > If account subscription has expired, redirect to
This is the page a visitor gets directed to if their subscription account has expired.
This can be a local page, a page on another domain or the system defaults. Enter relative path (eg: page.html) or full url starting http://.
This can be a local page, a page on another domain or the system defaults. Enter relative path (eg: page.html) or full url starting http://.
Redirects > If fixed account has expired, redirect to
This is the page a visitor gets directed to if their fixed account has expired.
This can be a local page, a page on another domain or the system defaults. Enter relative path (eg: page.html) or full url starting http://.
This can be a local page, a page on another domain or the system defaults. Enter relative path (eg: page.html) or full url starting http://.
Redirects > If account is awaiting subscription payment, redirect to
This is the page a visitor gets directed to if their account is awaiting the initial payment from an admin request.
This can be a local page, or a page on another domain. Enter relative path (eg: page.html) or full url starting http://
This can be a local page, or a page on another domain. Enter relative path (eg: page.html) or full url starting http://
Redirects > If subscription was stopped, redirect to
This is the page a visitor gets directed to if their subscription was stopped.
This can be a local page, a page on another domain or the system defaults. Enter relative path (eg: page.html) or full url starting http://.
This can be a local page, a page on another domain or the system defaults. Enter relative path (eg: page.html) or full url starting http://.
Redirects > If last payment failed, redirect to
This is the page a visitor gets directed to if their last subscription payment failed.
This can be a local page, a page on another domain or the system defaults. Enter relative path (eg: page.html) or full url starting http://.
This can be a local page, a page on another domain or the system defaults. Enter relative path (eg: page.html) or full url starting http://.
Redirects > If payment was refunded, redirect to
This is the page a visitor gets directed to if their payment was refunded.
This can be a local page, a page on another domain or the system defaults. Enter relative path (eg: page.html) or full url starting http://.
This can be a local page, a page on another domain or the system defaults. Enter relative path (eg: page.html) or full url starting http://.
Redirects > If account is awaiting approval or re-activation, redirect to
This is the page a visitor gets directed to if their account is awaiting approval or re-approval.
This can be a local page, a page on another domain or the system defaults. Enter relative path (eg: page.html) or full url starting http://.
This can be a local page, a page on another domain or the system defaults. Enter relative path (eg: page.html) or full url starting http://.
Redirects > If lockbox is disabled, redirect to
This is the page a visitor gets directed to if their lockbox is disabled.
This can be a local page, a page on another domain or the system defaults. Enter relative path (eg: page.html) or full url starting http://.
This can be a local page, a page on another domain or the system defaults. Enter relative path (eg: page.html) or full url starting http://.
Redirects > If account is disabled, redirect to
This is the page a visitor gets directed to if their account is disabled.
This can be a local page, a page on another domain or the system defaults. Enter relative path (eg: page.html) or full url starting http://.
This can be a local page, a page on another domain or the system defaults. Enter relative path (eg: page.html) or full url starting http://.
Redirects > If account has custom status, redirect to
This is the page a visitor gets directed to if their account has a custom status.
This can be a local page, a page on another domain or the system defaults. Enter relative path (eg: page.html) or full url starting http://.
This can be a local page, a page on another domain or the system defaults. Enter relative path (eg: page.html) or full url starting http://.
Redirects > On successful login, redirect to
This is the page a visitor gets directed to on successful login. This is optional.
This can be a local page, a page on another domain or the system defaults. Enter relative path (eg: page.html) or full url starting http://.
This can be a local page, a page on another domain or the system defaults. Enter relative path (eg: page.html) or full url starting http://.
Variables
This is useful if you want to set custom variables and want each to have a different value in different
lockboxes. For example, you could set a variable called 'package' and name it different in each variable set. You can
use variables in the existing PHP templates, custom templates or when adding new pages.
As well as static variables you can also use dynamic variables and execute PHP code. Very useful for more scope within your variables that you may want to change on a per member basis. Dynamic variables are for advanced users only.To create a dynamic variable, see below.
To add static variables, enter a variable name in the left box and it's corresponding value in the right. Names should be short for reference and should not be duplicated. Use the and buttons to add new lines before clicking the main button to add/update a lockbox.
For details on how to use variables, see the Template/Language section.
Dynamic Variables
Dynamic variables offer more complex values based on PHP functions you create. Functions inside classes are called methods, but here we will refer to them as functions. All functions should be created in the following file:
control/classes/class.box_vars.php
See the notes at the top of this file. There are two example functions inside this file so you can see how it works. The functions are 'example_date', which returns the current date and 'example_mem' which returns either 'Admin' or the member ID. These can be removed if you wish.
All functions should return a value based on your evaluation criteria.
When adding a dynamic variable, the 'Value' must always be prefixed with 'fnc_'. This tells the system to look for a function. If this is used, value can contain ONLY letters/numbers and underscores. If the function is not set correctly or is missing an error message will display.
Here is how you would set the test variables/functions:
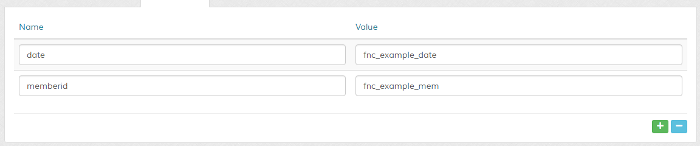
In your page info you can use {date} and {memberid} respectively to return the function values.
Member, lockbox and package information is sent to all functions. See notes in above file.
IMPORTANT! Data returned from functions is not sanitized in anyway, you MUST take any necessary precautions with returned data where necessary. If you don`t even understand this, you need to find someone who does.
For details on how to use variables, see the Template/Language section.
control/classes/class.box_vars.php
See the notes at the top of this file. There are two example functions inside this file so you can see how it works. The functions are 'example_date', which returns the current date and 'example_mem' which returns either 'Admin' or the member ID. These can be removed if you wish.
All functions should return a value based on your evaluation criteria.
When adding a dynamic variable, the 'Value' must always be prefixed with 'fnc_'. This tells the system to look for a function. If this is used, value can contain ONLY letters/numbers and underscores. If the function is not set correctly or is missing an error message will display.
Here is how you would set the test variables/functions:
In your page info you can use {date} and {memberid} respectively to return the function values.
Member, lockbox and package information is sent to all functions. See notes in above file.
IMPORTANT! Data returned from functions is not sanitized in anyway, you MUST take any necessary precautions with returned data where necessary. If you don`t even understand this, you need to find someone who does.
For details on how to use variables, see the Template/Language section.
Message > Lockbox Welcome/Information Message
Displays on lockbox homescreen. This can be set differently for each member if required. Adding a
member message will overwrite this message. Use the WYSIWYG editor for formatting and the tags
shown for personalisation.
Options > Max IP Addresses Allowed
If set, allows only the set number of IPs to access the lockbox account. These days people
have different IP addresses, but also share login details with friends. This useful security option can help
prevent multiple logins from the one account. Max 99999.
It's worth considering the fact that many people have laptops, tablets and phones these days and log in from work and home locations. Also people without fixed IP addresses will have a different IP should they restart their router. You should factor this into your limit.
If you set a limit of 1, the login IP must always be the same as the signup IP. This is the strictest setting.
Set to 0 to disable. Note that there are no restrictions for the master login credentials. You can also set different values for different members via the member override option.
NOTE: To clear existing IP addresses, delete the corresponding login events for a member.
IMPORTANT: For this feature to work, 'login' events MUST be enabled in the members event log.
Options > If Max IPs Exceeded, Send Email Notification to Admin
If enabled and above limit is set, sends email to admin with account details and IP addresses.
Options > Lockbox Enabled
Enable or disable lockbox
Options > Auto Enable on Date
If you have the lockbox disabled and wish to auto enable it on a given date, click into this field to specify a date.